Page History: How To Setup POP3 or IMAP Email in Mozilla Thunderbird
Compare Page Revisions
Page Revision: 25/01/2010 15:51
To setup your new POP3 or IMAP email account in Mozilla Thunderbird version 3.0, following these instructions. If you have an older version of Mozilla Thunderbird, please download and install the latest version here -
Download Thunderbird.
To learn more about the different types of email solutions offered by Webvault please read
Getting Started with Webvault Email Services.
New Account Setup Instructions
On the main screen select; Create a new account

On the
Mail Account Setup dialog window enter following information and then click the
Continue button.
Your Name: (Enter your first and last name, or your business name. This is the name people will see when you email them, Eg. Joe Bloggs)
Email Address: (Specify your email address. This must be accurate for you to receive reply emails, Eg. joe@yourdomain.com.au)
Password: (Enter your email account password)

On the next
Mail Account Setup dialog window, enter the information as follows.
Editing Config
User Name: (Enter your email account username, Eg. yourdomain.username)
Incoming: (Enter the incoming server details for your email account, normally in the following format, Eg.
mail.yourdomain.com.au)
Outgoing: (Enter your outgoing email server, normally the mail server of your Internet Service Provider (ISP), Eg.
mail.yourisp.com.au)

When you have finished entering the correct settings, click the
Create Account button.
Changing your Account Settings
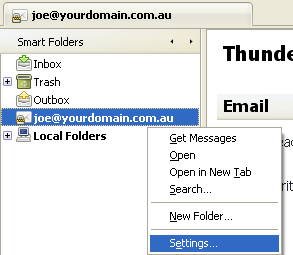
In Mozilla Thunderbird you can modify your email account settings at any time. Right Click on the
email account on the left hand side, and choose the
Settings option.

Advanced Account Settings
Here is a brief overview of how to configure the advanced email account settings available in Mozilla Thunderbird.
If you are using an
SMTP enabled email account with Webvault then it is recommended that you change the
Outgoing Server (SMTP) port from the default 25 to 366. This will allow you to bypass firewall restrictions that most internet access providers impose on connections to remote mail servers. You can also use the secure SSL encryption options as shown for additional privacy and security with sending or retrieving email.
NOTE: Webvault does NOT provide SMTP enabled email accounts by default. For more detailed information about your Outgoing Email Server Settings please refer to our Outgoing Email Server SMTP Settings article. IMPORTANT NOTE: If you use the SSL encryption settings to retrieve or send email, you MUST change your Incoming and Outgoing Mail Server settings to email.webvault.com.au as shown otherwise you will receive a certificate mismatch error.
To edit advanced settings, right-click on your email account on the left hand side and select settings
Click on
Outgoing Server (SMTP) on the left hand side and then choose your SMTP server from the list and click on edit. If your email account has been enabled for SMTP by one of our support staff change the
Server Name to
email.webvault.com.au and change the port to
366. You must also tick the
Use name and password checkbox, and you may need to enter your email account username in the textbox provided.
